
The Lazy Genius Guide to Food Prep
Why We’re Talking About This
Sometimes you’re in the middle of a food prep session and think, “Man, I should tell people about this!” So here we are.
If you follow me on Instagram, you might have seen a story I did while in the middle of a food prepping session, and if you want to watch it again, it’s in the Meal Prep highlight. I spent 75 minutes after a grocery trip prepping a boatload of food, and my DMs were exceptionally active that day. It sounds like you guys are interesting in knowing my system, and I’m nothing if not willing to share my systems.
P.S. This post is how to prep. If you want extra help on how to cook, check the bottom of this post for a list of Lazy Genius resources.
Meal Prep vs. Food Prep
Meal prep is prepping meals. Food prep is prepping food.
Clear as day, right?
Meal prep is when you prep food knowing what its eventual meal is or you completely cook the meal itself to reheat later. Food prep is getting food in some kind of “ready, set” form so that when you need to eat, it’s basically time to “go.”
When you food prep, you might not have an endgame in mind, but you’re comfortable enough with what you eat and how to throw things together that you trust it’ll get eaten somehow.
If you’re a new cook or struggle to know what foods go together, you might need to start meal prepping more than food prepping. Otherwise, you might be a tad overwhelmed at a ton of prepped food you have no idea what to do with. So if you like recipes more than riffing, aim for more meal prep than food prep as you get started. While this post is geared more toward food prep, you can still learn a lot.
Most post-shopping prep sessions will include both meal and food prep, and your cooking skills, lifestyle, and preferred ways of cooking and eating will be your guide as you decide what to do with the food you bring home. That means you might food prep breakfast and lunch, too, or you just care about dinner. Think about what your needs are in the kitchen, and food prep accordingly.
For the record, I food prep with few concrete intentions. Nothing is sacred, so if a kid wants something for a snack, I want lunch, my husband wants a second dinner, anything food prepped is generally up for grabs. If it’s not, I specifically label it based on what it’s for.
For one more record, do I do this every week? Not at all. A lot of weeks are bizarro meal prep weeks where I’m taking food on its last legs and redeeming it before it hits the trash. This isn’t that. I don’t always have the needs or fridge space to do a food prep session as large as the one in the photo, but some version happens at least once or twice a month. I just go with the rhythm that makes sense for our week, our budget, and my time. Don’t feel penned in to this way every week; you get to choose.
The Master Rule of Food Prep
Prep immediately after you shop.
I realize this isn’t always possible, but as much as you can, make this a priority. By prepping immediately after, you’re already in the zone. You’re not putting away groceries that you’ll eventually need to pull out again., and you know what you bought so you won’t forget to prep something later.
And bonus rule: don’t make your time fit your food prep; make your food prep fit your time.
If you generally pick up your groceries on your way home from Saturday morning soccer practice and usually only have half an hour before The Next Thing Happens, don’t cram two hours’ worth of food prep into that half hour and kill yourself. Make your food prep fit the time; do a little, and call it good.
The Most Important Shopping Tip
Before you leave your house, make sure your kitchen counters are cleared.
This is way more important for bigger shopping trips than a banana run, but the idea is true regardless of the size of your grocery haul. Coming home to clean counters that are happy to receive bags is the best kind of gift to your future self.
Usually, we plan for a biggish shopping trip, so we can plan to clean off the counters, too. Planning, however, doesn’t mean cleaning out the fridge or disinfecting the counters. It just means putting the breakfast dishes in the dishwasher and wiping the peanut butter off the counter so your bags don’t annoyingly stick to it when you get home. You’re just looking for a clean landing space.
If you have stuff on your counters that doesn’t have a home - piles of mail, a bag of clothes that need to be sorted, “project” stuff - just move it. It shouldn’t be on your kitchen counters anyway because your counters are sacred and should be graciously awaiting the next time you need to feed somebody, not to store components of your to-do list. So don’t feel the need to complete three projects in order to clean off the counter; just clean off the counter. The projects can sit somewhere else.
The Second Most Important Shopping Tip
Only buy what’s familiar.
Dude. Buy new stuff. Okay, I just contradicted myself in a massive way, but if you’re new to food prep, don’t try it out on a lot of new ingredients. Stick with what you know.
Remember, food prep is getting ingredients ready to be used in recipes you haven’t necessarily decided yet or to just be eaten as is, so use ingredients that you like, that are friends with other foods you like, and that can be prepped in a way that makes you comfortable. We’ll get to the choosing shortly.
How much you buy is up to you, but start small.
Get comfortable with enough prepped food in your fridge to give you a win or two, not so much that you’re anxious about it all going bad. Just take it one shopping trip at a time, and notice if you have waste, if you run out of prepped food, etc. What I’m sharing is a list of steps, not prescriptive foods or their quantities. If you’re nervous, pick one food to prep. One food still makes a huge difference.
Get Your Food Into Zones
The best way to streamline the post-shopping-trip madness is to get your groceries into zones based on where they need to go once they’re in your kitchen. Your zones are probably fridge, freezer, pantry, and the all-important prep zone. We’ll get back to that.
Putting your groceries into zones rather than putting them away as they come out of the bag might feel odd, but it’s shockingly more efficient. It’s the same idea as cleaning the kitchen by using a fridge and dishes zone; y’all thought I was crazy, but that episode is a winner. Group stuff together in shorter motions, and then put a group away all at the same time. You eliminate pantry/freezer/fridge Tetris, and you save a few motions, too.
You can put your food into zones a few ways.
Put your groceries on the store conveyer belt in zones, and trust that the cashier will mostly bag them in that order.
Bag your groceries yourself in zones. Fridge bag, freezer bag, prep bag, etc.
If you shop at a bulk store and don’t have anything in bags, put the stuff directly in your car in zones. Left side of the trunk is fridge, right side is freezer, bag seat is prep, etc.
Just unload the groceries from whatever bag into zones on your counter.
Again, don’t do this if you buy five things. Somebody is likely to ask you if everything is okay. But for big hauls? All the way.
The Prep Zone
At this point, you’ve put away all the items that aren’t going to be prepped right now, and you’re left with what’s in The Prep Zone. It feels so exciting, doesn’t it?
Just me? Cool.
How do you decide what goes in the prep zone?
Here’s my random rule of thumb: when food is prepped, you’re happy to eat it.
This isn’t the time for chopping onions you might use or dicing raw potatoes and putting them raw in a container of water to keep them form turning brown. I don’t want to snack on those onions. I don’t want to make a lunch of those potatoes. Those ingredients count as meal prep because I only prep them if I know where they’re going.
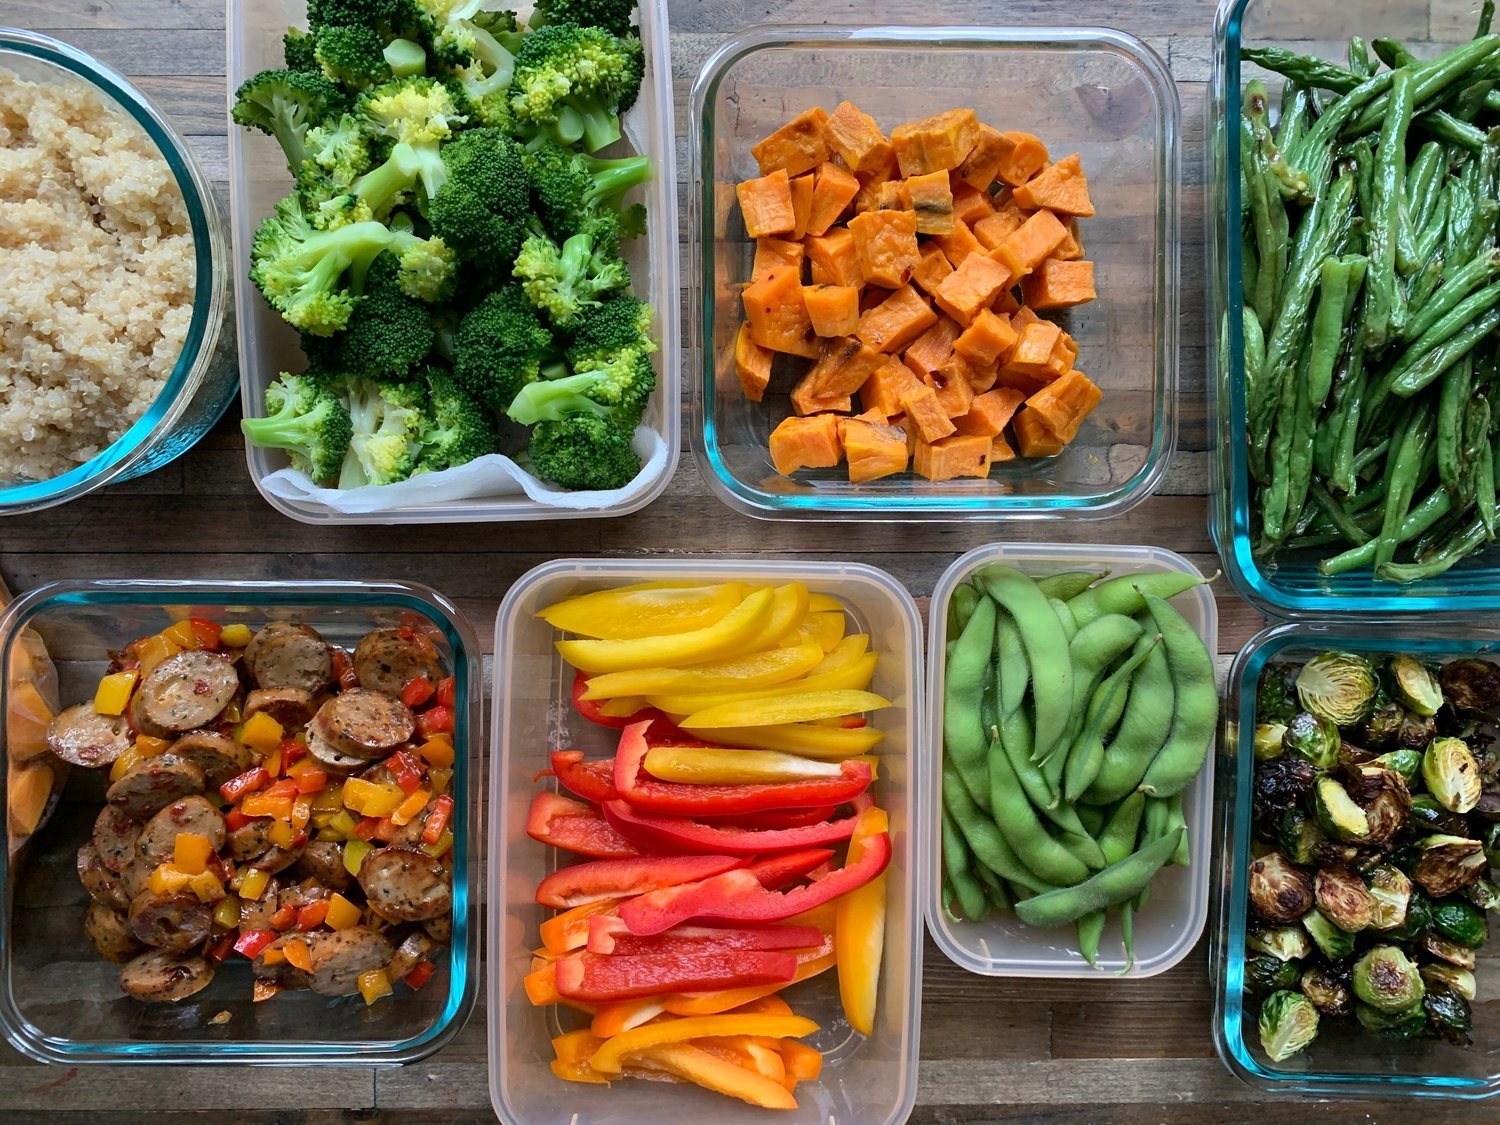
Let’s look at my photo again. Here’s what’s there:
Clockwise from the top left: cooked quinoa, steamed broccoli, roasted sweet potatoes, roasted green beans, roasted brussels sprouts, steamed edamame, sliced bell peppers, sautéed sausage and peppers, and can you see that little glimmer of orange next to it? Those are steamed sweet potatoes in a freezer bag. I’m trying them in smoothies; I’ll keep you posted.
I ate every single one of these things as I prepped, and then I layered a bunch of them into a bowl for my lunch.
The biggest point of food prepping is having food that’s so close to a meal that it can be grabbed or dunked in sauce or reheated and be awesome. Basically right away. Immediate awesomeness. Raw potatoes in water are helpful but not immediately awesome.
Deciding How to Prep the Food
Guess what? Now you have your question.
“What can I do to make this ingredient immediately awesome?”
Peppers and pineapple just need cutting.
Broccoli could use a hand with a bit of steaming or roasting.
Sausage most definitely should be sautéed so you don’t end up in the hospital.
And if you’re worried about your choice, here’s your next question:
“Will this ingredient stay immediately awesome after a few days in the fridge?”
If you saute zucchini, it’s a delight hot from the pan. If you reheat that same zucchini a day later, it’s a severe disappointment. If you’re unsure, think about how you’d reheat it.
This is where starting small is important. If you prep a dozen different ingredients but don’t have practice using them in different ways or knowing how they might reheat based on how you cook them, you’ll be more frustrated than anything. If you’re unsure, start with one ingredient. Make it immediately awesome, and then see if it stays that way after a nuke in the microwave or a refresh in the oven.
Once you decide what ingredient gets what treatment, break your prep zone into smaller prep zones. Group everything that’s getting roasted, make another pile of what’s getting steamed, and another for what you’re just going to chop up raw. That helps a ton with the actual prepping process.
The Order to Prep the Food
Now we’re getting into it.
You now have ingredients that will be prepped the same way grouped together. Your likely groups are roast, steam, saute, and chop. And that’s your order:
Roast
Steam
Saute
Chop
That, of course, doesn’t mean that you don’t steam anything until all the roasting is done. Roasting generally takes the longest, so get a pan in the oven first. To give you an idea of how all of this works together, I’ll share the order I food prepped in just a second.
After roasting comes steaming. The beauty of steaming is that because it happens so quickly, it leaves just enough time to prep the next food that needs steaming. You become a steaming machine while the first pan roasts, and it’s magnificent.
You do sauteing after steaming because you can use the same pan. I use a regular metal basket steamer in a deep saute pan with a lid, so once the steaming is done, I wipe out the water, add oil, and saute away.
Finally, after you’ve prepped all the food that’s going into a pan or pot, as you wait for food to cook, take care of what needs to be chopped. Obviously, you’ve already done a good bit of chopping to get stuff ready to roast and steam, but this category of chopping is just stuff that’s chopped and then put immediately into a container or your mouth.
One Example of Food Prepping From Start to Finish
This is what I did to get this picture. I love how prepared I was to write this post (slash not at all) because I’ve now used the only picture I took three actual times.
I divided up my prep zone into categories: green beans, brussels sprouts, and sweet potatoes for roasting; broccoli, edamame, sweet potatoes, and quinoa that ended up in the Instant Pot; sausage and peppers for sauteing; and pineapple (not shown) and the rest of the peppers (which stayed in the saute pile first).
I preheated the oven to 425.
I covered a giant sheet pan in parchment (no cleanup!), dumped the bag of prewashed green beans on there, drizzled with oil and salt, and put them in the oven before it was preheated. No harm done.
Now that the first food was rolling, I pulled out my giant cutting board, a knife, a peeler, a bag for trash, a roll of washi tape and a Sharpie for labeling, and a bowl for ice water for some of the steamed stuff.
I started cubing sweet potatoes - half for steaming, half for roasting. Once half were done, I put them on a pan and put them in the same oven with the green beans.
I got the quinoa going in the Instant Pot.
I filled a big saute pan with water, popped in the steamer basket, and turned on the burner. While the water got hot, I broke a head of broccoli into florets, put them on the steamer basket, put on a lid, and let it go for maybe four minutes, until immediately awesome. No salt needed for steamed broccoli; I find it perfect just the way it is. (P.S. It’s great for snacking but also to throw in stir-fry and such.)
While the broccoli steamed, I kept cubing up sweet potatoes.
When the broccoli was done, I dumped it into the bowl of ice water to stop the cooking, and then added a bag of edamame to the steamer, and put the lid back on.
The edamame needed to go into the ice water three minutes later, so I pulled the broccoli out of the water with tongs, gave it a few good shakes, and put it in a container lined with a paper towel to soak up extra liquid.
Edamame out and into the now available ice water; sweet potatoes in.
I cut brussels sprouts in half to roast.
Green beans out of the oven and into a container, lid off while it cooled. (Leave your containers in the same area with the lids off to cool, not just because it’s out of the way but because it’s incredibly motivating to see all those pretty prepped foods lining up like happy soldiers.)
Brussels sprouts into the oven.
I cut three bell peppers into slices and turned a few of those slices into dices. (Wicka wicka wah.)
I sliced the sausage.
I pulled the sweet potatoes out of the oven and the steamer. Remember, they were being cooked two ways. Steamed sweet potatoes do not go in an ice bath. That will go from immediately awesome to immediately terrifying.
I wiped out the pan used for steaming, turned up the heat, added some olive oil, and sauteed the sausage and diced peppers. That’s a great component to a salad, a quinoa bowl, tossed with scrambled eggs, or just for snacking.
Diced the pineapple.
Got everything into a labeled container.
Threw away all the parchment paper, and PUT AWAY PERFECTLY CLEAN SHEET PANS.
Immediately rinsed the Instant Pot pot, or the quinoa would’ve turned to angry rocks.
Washed it, the saute pan, and the knife.
Threw away the bag of food prep trash.
Wiped off the counters.
Piled a bunch of the ingredients into a bowl for lunch before closing up the containers and putting them in the fridge.
Declared myself victorious in a span of 75 minutes.
While you will never do exactly those foods in that way all at once, do you see how it’s a dance? Roast first and prep the next thing. Once roasting is rolling, start steaming. Get one thing rolling and prep the next thing. If you go in the order of roast, steam, saute, and chop, you’ll find a great rhythm.
GO FORTH AND FOOD PREP, YOU BEAUTIFUL PEOPLE.
Resources
The Flavor Bible (my absolute favorite book slash encyclopedia for knowing foods go together)
The Lazy Genius Guide to Roasting Stuff (so you know how to roast)
Bizarro Meal Prep (for when you forget to food prep right after you shop)
The Lazy Genius Meal Plan (for when you want a better idea of what you’ll cook later)
my steamer basket (because maybe you don’t have one)
The Ultimate Instant Pot Cookbook (my favorite Instant Pot cookbook)
glass storage containers (I have plastic, too, but a set similar to this is my favorite. I got mine at Costco.)
The Lazy Genius Guide to Lunch (for ideas on how to use the food prep)
The Lazy Genius Fixes Breakfast (same)
The Lazy Genius Stocks the Kitchen (to know what you should buy in the first place)
The Lazy Genius Shops at Aldi (obvs)
The Lazy Genius Shops at Costco (also obvs)
When Buying In Bulk Is a Terrible Idea (if you get a little too happy at Costco)
The Lazy Genius Shops at the Farmers Market (you get the idea)
The Lazy Genius Makes Salad (to know how those tidbits of food prep are magic for your salad game)
The Lazy Genius Cleans the Kitchen (the first time we learned about zones)
The Lazy Genius Makes a Smoothie (your food prep could land here, too)
Just so you know, this post contains affiliate links to products on Amazon. All that means is if you buy something from one of my links, I earn a small commission at no cost to you.